You will need three good brushes. The better the quality, the fewer hair bristles will come loose from the brush and get onto the wall. I use 2 to 3 inch wide brushes that will carry a lot of paint. Stiff china bristle are good because the hair frizzes out as you use them and they produce a nice fuzzy pattern. I don't recommend the nylon hair as they retain their shape and the actual brush shape shows up in the graphics unless you work them out as you go with a wet sponge or rag.
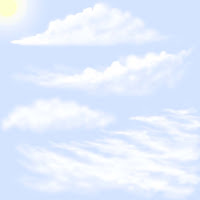
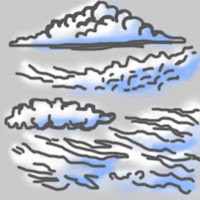
Paint the graphic area completely with the light blue color with roller, brush or spray. Get a mindset of some familiar cloud shapes. Avoid popcorn, square, triangular or geometric shapes. (Yes, they happen in nature, but you may have to explain what the intent was later). Here are some picture examples that show some basic shapes that work. Layout some general areas first if you like with light pencil lines, but please don't use these like a paint by number, it could take away the spontaneity and fun of the painting process.


I like to use a large piece of cardboard or plastic about 2' x 2' to pour paint on and use as a pallet. Dip one brush in white, one in blue and have the other brush wet with water ready to blend the two. Start with the white highlights, in the top area towards the imaginary light source (the sun). Paint the body of the cloud blue then quickly use the neutral brush (wet, but not dripping) to blend and crush the two together. Push the paint in fast swipes and straight-on crushes, the accidental areas that are produced this way make it look like any area was worked on for hours! Leave some pure white on the tops and some pure blue for shadows. Work the body of the cloud with some pure white and crush again with the blue and the in between wet brush. Find a pace that is quick for the best results. Keep a small bucket of water handy to wet the brushes occasionally and keep the paint flowing. Don't worry about the colors mixing from one brush to the next! This helps the unplanned natural look of wind pushing clouds around!
Random the shapes, if you get two or more that are very similar and create repeating pattern, they may not be convincing. Step back or leave for a moment, observe, go back and work any area with your first thoughts. Having a range between the two colors makes working over an area relatively safe and looks more detailed. Note that the background light blue creates the backside shadowed part of the clouds. For first time painters you will find it may not be best to over think and redo a lot, work the detail you think you need, take a break away from it. Then get that second look and show someone else. You will both be pleased.
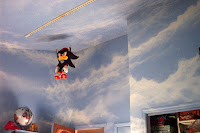
For even more realism or just want to go further, do the same basics, get some mental snapshots in your head you've seen or use reference pictures from some source. Try adding a very slight tint of yellow and pink and get more of an oil painting feel. Grays and purple will be stormy or give more drama. Brighter yellows, orange, magenta, bright or process blues and purples will turn them into sunrise/sunset clouds. In addition to these methods, I use an airbrush for even softer effects and adding colors. My son Justin's room was started with an inexpensive Wagner brand airless spray gun to start the white. See Mural page of my website, the picture has a stuffed toy hanging from the ceiling. http://timsartcreations.com/
Great decorating idea is to hang something like an airplane model, hot air balloon, etc. Add glow in the dark stars for a cool night time effect.
Great cloud effect... I remember when you and Mike went to Nashville or Memphis or somewhere to do a sky effect on a ceiling...I wish I could have been a fly on the wall at that combined effort....and, speaking of Mike, do you ever see him anymore? He was awesome with that airbrush...
ReplyDelete